Diving into the world of home canning offers immense satisfaction, allowing you to preserve the bounty of your garden or seasonal produce for year-round enjoyment. However, for non-acidic foods like vegetables, meats, and soups, the only safe method is pressure canning. This comprehensive guide to pressure canning will equip you with essential tips to navigate the process confidently, focusing on crucial aspects like preventing jar breakage, mastering headspace, and ensuring airtight seals for maximum food safety and quality.
Understanding Your Pressure Canner: Equipment & Safety First
Unlike water bath canning, which is suitable for high-acid foods such as fruits, jams, and pickles, pressure canning is indispensable for low-acid foods. These include virtually all vegetables, meats, poultry, seafood, and soup stocks. The reason is simple: harmful bacteria, particularly Clostridium botulinum (which causes botulism), thrives in low-acid, oxygen-free environments. A pressure canner reaches temperatures far exceeding the boiling point of water (212°F or 100°C), typically 240°F (115.5°C) or higher, which is necessary to destroy these dangerous spores. If you're wondering more about this critical distinction, explore Why Pressure Canning is Essential for Low-Acid Foods Safety.
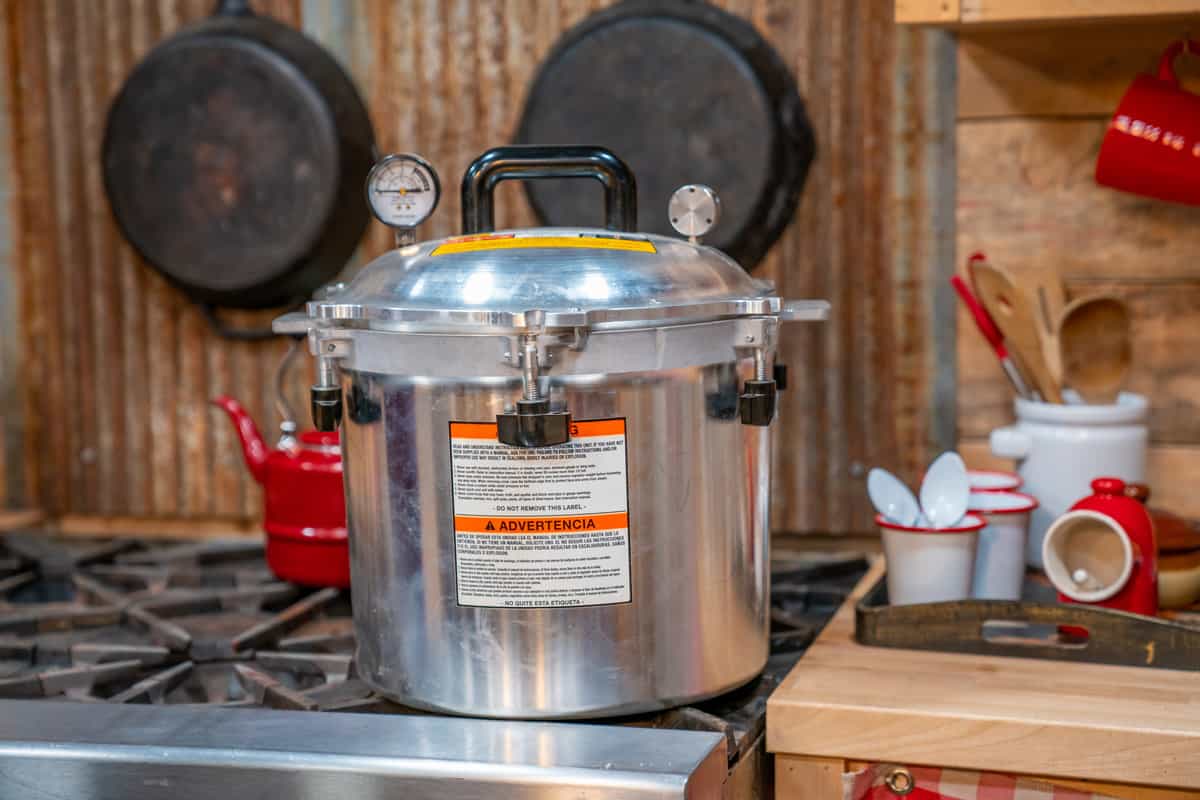
Every journey begins with the right tools. Your pressure canner is a specialized piece of equipment designed to safely process these foods. While brands vary, most modern canners come equipped with both a weighted gauge and a dial gauge for precise pressure monitoring, along with multiple ventilation ports. It's paramount to thoroughly read and understand your specific manufacturer’s instructions before its first use. This isn't just a suggestion; it's a critical safety directive.
A non-negotiable component of your pressure canning setup is the canner rack. This rack sits at the bottom of your canner, elevating the jars and preventing them from touching the hot bottom directly. Without it, the direct heat exposure can cause thermal shock and lead to catastrophic jar breakage. Ensure it's always in place!
Most standard pressure canners hold seven quart jars or eight to nine pint jars. Some larger models can accommodate 18 pint jars in two layers, but still typically only seven quart jars. It’s important to note that smaller pressure saucepans are generally not recommended for canning due to their limited volume and difficulty in maintaining consistent pressure and venting procedures required for safe processing.
Mastering Pressure and Elevation: The Science of Safe Canning
Achieving the correct internal temperature within your jars is directly dependent on the pressure maintained inside your canner. And this pressure isn't a one-size-fits-all setting; it's influenced by your altitude above sea level. As elevation increases, the boiling point of water decreases, meaning you need more pressure to reach the same sterilizing temperature.
For instance, if you are at 0 to 1,000 feet above sea level, you'll generally need to maintain a minimum of 11 pounds of pressure for most recipes. However, if you live at higher altitudes, you'll need to increase that pressure accordingly to compensate. Always consult a reliable, up-to-date canning guide (like those from the National Center for Home Food Preservation or your local extension office) to determine the precise pressure setting for your specific elevation and recipe.
Your canner's weighted gauge (often a set of rings or a single weight with different holes) allows you to achieve specific pressure levels, typically 5, 10, or 15 pounds. For most low-acid foods, 10 or 15 pounds of pressure will be required, adjusted based on your altitude. Learn how to correctly place or adjust your weights on the canner's vent pipe to achieve the desired pressure. Precision here is not just about a successful batch; it's about food safety.
The Art of Jar Preparation: Preventing Breakage and Ensuring Quality
Before you even think about filling jars, proper preparation is key to preventing breakage and ensuring a successful seal. Start with inspecting your canning jars for any nicks, cracks, or chips, especially around the rim. Damaged jars should be discarded as they can break under pressure or prevent a proper seal.
Jar Types: Standard canning jars come in various sizes and mouth types: wide mouth (easier for chunky foods) and regular mouth (great for liquids). Common sizes include pint, quart, and half-gallon. Always use jars specifically designed for home canning, as commercial food jars are not made to withstand the high temperatures and pressures of canning.
Preventing Breakage through Thermal Shock: One of the most common causes of jar breakage is thermal shock. This occurs when there's a significant temperature difference between the glass jar and its contents, or between the jar and the water in the canner. To avoid this:
- Match Temperatures: Always ensure the food you are putting into the jars is roughly the same temperature as the water you will be placing the jars into in the canner. For hot-pack methods, jars should be hot, and the canner water should be hot. For raw-pack methods, jars and canner water can be warm or cool, but consistency is key.
- Preheat Jars: If hot packing, sterilize jars by immersing them in simmering water (180°F or 82°C) for 10 minutes, or keep them hot in a dishwasher until ready to fill.
- Gradual Heating/Cooling: Never introduce cold jars to a hot canner, or hot jars to a cold canner. Similarly, allow the pressure canner to cool naturally after processing before opening it and removing jars.
Mastering Headspace: Headspace refers to the empty space between the top of the food in the jar and the underside of the lid. This seemingly small detail is incredibly important for two critical reasons:
- Food Expansion: During the heating process, food expands. Adequate headspace allows for this expansion without the food boiling over, which can interfere with the seal.
- Vacuum Seal Formation: As the jars cool, the contents contract, creating a vacuum that pulls the lid down to form an airtight seal. Too little headspace can prevent this vacuum, leading to an unsealed jar. Too much headspace means there's too much air in the jar, which can lead to food discoloration and a weaker vacuum.
The correct headspace varies by food type:
- 1 inch: For low-acid foods like meats, poultry, and many vegetables (e.g., beans, corn). This larger space allows for more expansion.
- ½ inch: For fruits, tomatoes, and other high-acid foods.
- ¼ inch: For jams, jellies, and relishes.
Always use a headspace tool to measure accurately. A ruler or even your finger can work in a pinch, but a dedicated tool ensures consistency.
The Canning Process: From Filling to Sealing Success
Once your jars are prepared and your canner is ready, you can move on to the actual canning process. This typically involves:
- Preparing and Filling Jars: Follow your recipe meticulously. For example, when canning beans, they often require rinsing and sorting before filling jars. Fill jars with your prepared food, leaving the specified headspace.
- Removing Air Bubbles: After filling, use a non-metallic utensil (like a plastic spatula or chopstick) to gently remove air bubbles from around the food. This helps ensure consistent heating and a better seal. Then, re-check headspace and adjust if necessary.
- Wiping Rims: Clean the jar rims thoroughly with a damp, clean cloth. Any food residue or grease on the rim can prevent the lid from sealing properly.
- Applying Lids and Rings: Place new, sterile lids (never reuse canning lids!) on the jars. Screw on the canning rings "fingertip tight"—just enough to hold the lid in place, but not too tight, which can prevent air from escaping during processing.
- Loading the Canner: Place the filled jars onto the rack in your pressure canner. Add the amount of water specified by your canner's manufacturer (usually 2-3 inches).
- Venting the Canner: This is a critical safety step! Before closing the lid tightly and bringing the canner up to pressure, allow steam to escape steadily from the vent pipe for a specific duration (usually 10 minutes). This purges all the air from the canner, ensuring that the pressure reading is due to pure steam, not a mix of air and steam, which can lead to unsafe processing temperatures. Even small capacity canners require proper venting.
- Processing: Once vented, apply the weighted gauge or close the vent, and bring the canner up to the required pressure. Maintain this pressure consistently for the duration specified in your recipe. Fluctuations can compromise food safety.
- Cooling and Testing Seals: After the processing time is complete, turn off the heat and allow the canner to cool naturally until the pressure gauge returns to zero. Do NOT rush this process by forcing cooling, as it can cause liquid loss from jars and potential breakage. Once cool, remove the weighted gauge, wait a few more minutes, then carefully open the lid away from your face. Remove jars and place them on a towel or cooling rack, ensuring they are not touching, for 12-24 hours.
Testing the Seal: After the cooling period, check for a proper seal. The center of the lid should be concave (curved inward) and not flex when pressed. You can also tap the lid; a clear, ringing sound usually indicates a good seal, while a dull thud might mean a weak or no seal. If a jar hasn't sealed, refrigerate it immediately and consume the contents within a few days, or reprocess it within 24 hours using a new lid, following all steps carefully. For a more detailed walkthrough, consider our Pressure Canning for Beginners: Essential Guide to Safe Home Food.
Embarking on your pressure canning journey can be incredibly rewarding. By understanding your equipment, respecting the science behind pressure and elevation, meticulously preparing your jars to avoid breakage and ensure correct headspace, and diligently following each step of the canning process, you’ll produce shelf-stable, delicious food safely. Remember, precision and adherence to tested recipes are your best allies in making your canning adventures enjoyable and successful.
