Why Pressure Canning is Essential for Low-Acid Foods Safety
The allure of a well-stocked pantry, brimming with homemade preserves, is undeniable. Home canning allows us to savor the harvest year-round, capture seasonal flavors, and even prepare for unexpected times. However, for a significant category of foods—specifically low-acid items—the path to safe preservation requires a specialized and non-negotiable technique: pressure canning. Understanding this method isn't just about extending shelf life; it's about safeguarding your health and that of your loved ones against serious foodborne illnesses. This comprehensive guide to pressure canning will illuminate why it's indispensable for certain foods and how to master it safely.
The Non-Negotiable Rule: Why Low-Acid Foods Demand Pressure Canning
When it comes to home canning, the acidity level of your food dictates the processing method. Foods are broadly categorized into high-acid and low-acid. High-acid foods, such as fruits, jams, jellies, pickles, and tomatoes (often with added acid), create an environment hostile to harmful bacteria, making them safe to process in a boiling water bath canner. However, for low-acid foods, a different approach is not just recommended, but absolutely critical.
Low-acid foods include most vegetables (beans, corn, carrots, potatoes, peas, asparagus), meats, poultry, seafood, dairy products, soups, and stocks. These foods lack the natural acidity needed to prevent the growth of Clostridium botulinum, a bacterium whose spores can survive the temperatures reached in a boiling water bath. In the oxygen-free, low-acid environment of a sealed jar, these spores can germinate and produce a potent, often fatal, neurotoxin – botulinum toxin. This is why a simple water bath canner, which only reaches 212°F (100°C) at sea level, is insufficient.
A pressure canner, conversely, utilizes steam under pressure to reach much higher temperatures—typically between 240°F and 250°F (116°C and 121°C) at 10-15 pounds per square inch (psi). These elevated temperatures are sufficient to destroy botulism spores, ensuring your home-canned low-acid foods are safe to consume. Ignoring this fundamental rule is simply not an option for responsible home preservation.
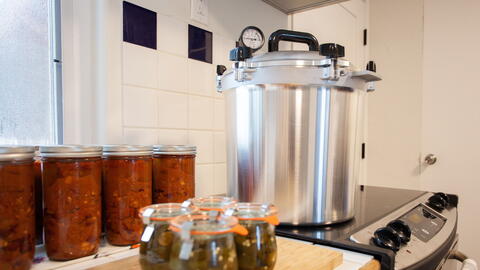
Understanding Your Pressure Canner: Equipment & Safety Essentials
Embarking on pressure canning requires the right equipment and a thorough understanding of its operation. A pressure canner is a robust piece of cookware designed to withstand high pressure, featuring a tight-sealing lid, a vent pipe, and either a weighted gauge or a dial gauge to monitor pressure. Most standard models are designed to hold seven quart jars or eight to nine pint jars, with larger options accommodating 18 pint jars in two layers, though they often still only fit seven quart jars. It's crucial to note that pressure saucepans, with their smaller volume capacities, are not recommended for safe home canning due to their inability to maintain consistent, reliable pressure over extended periods. For an in-depth look at starting your journey, consider our Pressure Canning for Beginners: Essential Guide to Safe Home Food.
Before using any pressure canner, reading the manufacturer's instructions from cover to cover is paramount, as each brand may have specific operational nuances. Key components to familiarize yourself with include:
- The Rack: Always use the canning rack at the bottom of the canner. This prevents direct contact between jars and the hot bottom surface, significantly reducing the risk of jar breakage due to thermal shock.
- Pressure Gauge/Weight: Whether your canner has a dial gauge or weighted gauges (often with different port pipes for 10 or 15 pounds of pressure), understanding how to read and maintain them is critical for accurate pressure control. Dial gauges should be checked for accuracy annually by your local extension office.
- Ventilation Ports: These are vital for allowing air to escape before pressure builds, a process known as venting, which ensures pure steam surrounds your jars for effective heat penetration.
Regular maintenance, such as checking gaskets and ensuring vent pipes are clear, is essential for the longevity and safe operation of your pressure canner.
Mastering the Process: Key Steps for Safe Pressure Canning
The journey of pressure canning involves several precise steps, each contributing to the safety and quality of your preserved goods. A clear understanding of these stages is integral to becoming proficient with this vital preservation method.
1. Elevation and Pressure Settings:
Your geographical elevation significantly impacts the boiling point of water and, consequently, the pressure needed inside your canner. At higher altitudes, water boils at lower temperatures, meaning you'll need to increase the pressure setting to achieve the necessary temperature for killing botulism spores. For example, at sea level to 1,000 feet, a minimum of 11 pounds of pressure is generally required for most low-acid foods. Consult USDA guidelines or your local extension office to determine the correct pressure for your specific elevation.
2. Jar Types and Headspace:
Use only jars specifically designed for canning (e.g., Mason jars). They come in various sizes (pint, quart, half-gallon) and mouth types (regular and wide-mouth). Always use new lids for each canning session to ensure a proper seal. Headspace—the empty space between the food surface and the rim of the jar—is crucial. Too little headspace can cause food to siphon out, preventing a seal, while too much can lead to under-processing. For many low-acid foods like beans, a 1-inch headspace is recommended to allow for food expansion during heating and proper vacuum sealing. For more detailed advice on preventing issues, refer to our Pressure Canning Tips: Avoid Breakage, Master Headspace & Seals.
3. Temperature Matching:
To prevent thermal shock, which can cause jars to crack or break, ensure the temperature of the food being canned matches the temperature of the water in your canner. If hot food is being packed (hot pack method, common for pressure canning), use hot water in the canner. Conversely, if packing raw food (raw pack method), use warm water.
4. Canning Process Walkthrough (e.g., Beans):
After preparing your food (e.g., soaking and rinsing beans), fill the clean, hot jars, ensuring the correct headspace. Place the filled jars on the rack in the pressure canner, add the specified amount of hot water (usually 2-3 inches), and secure the lid. Begin heating the canner, allowing a steady stream of steam to escape from the vent for 10 minutes (venting) to eliminate all air. Then, apply the weighted gauge or close the petcock to build pressure to the required level for your elevation and food type. Maintain this pressure for the recommended processing time. Precision is key in this stage, as slight fluctuations can compromise safety.
5. Post-Canning Handling:
Once the processing time is complete, turn off the heat and allow the canner to cool down naturally until the pressure gauge reads zero and the lid can be safely opened. Do not force cool the canner, as this can lead to liquid loss from jars and seal failures. Remove jars carefully without tilting, placing them on a towel or rack away from drafts to cool for 12-24 hours. After cooling, test seals by pressing the center of the lid (it should not flex) and ensuring it is concave. Remove bands, wipe jars clean, label them with contents and date, and store in a cool, dark place.
Beyond the Basics: Advanced Tips for Confident Canning
As you gain experience with pressure canning, you'll discover nuances that further enhance your success and safety. Beyond the fundamental steps, consider these insights to elevate your canning expertise:
- Quality Ingredients Matter: The safety and flavor of your home-canned goods begin with the quality of your raw ingredients. Always choose fresh, blemish-free produce, and ensure meats and seafood are handled hygienically. Canning will not improve the quality of poor ingredients.
- Adhere to Tested Recipes: Never experiment with processing times or methods for low-acid foods. Always use tested recipes from reputable sources like the National Center for Home Food Preservation (NCHFP) or USDA guidelines. These recipes are developed with scientific rigor to ensure safety.
- Regular Equipment Checks: Make it a habit to inspect your pressure canner's gasket, vent pipe, and pressure gauge before each use. Gaskets can wear out, vent pipes can become clogged, and dial gauges can lose calibration, all of which compromise the canner's performance and safety.
- Don't Rush the Process: Patience is a virtue in pressure canning. Resist the urge to open the canner before the pressure has fully dropped or to force-cool jars. Gradual cooling allows for a strong vacuum seal to form and prevents siphoning, which can lead to spoilage.
- Record Keeping: Labeling your jars with the contents and date of canning is essential for proper rotation and tracking shelf life. Keeping a canning journal can also help you refine your techniques and remember successful batches or adjustments made for specific recipes.
- Continuous Learning: The world of home preservation is always evolving with new research and best practices. Stay informed by consulting reliable resources and consider joining canning communities. This ongoing learning will strengthen your confidence as you master this rewarding skill.
Pressure canning, while initially seeming daunting, is a highly rewarding skill that empowers you to safely preserve a wide array of foods. It's a testament to the fact that understanding and respecting scientific principles in the kitchen can lead to both delicious results and unparalleled peace of mind. By following tested guidelines, understanding your equipment, and appreciating the critical role of high temperatures for low-acid foods, you're not just canning; you're ensuring safety, flavor, and self-sufficiency for years to come. Embrace this essential guide to pressure canning, and unlock a world of safe, homemade goodness.
